A simple step-by-step tutorial on how to create your own free ssl certificate on WSL by using Certbot
Back to main page
Quick intro:
WSL(Windows subsystem for linux) has enabled us to run linux command line apps on Windows. And Let’s Encrypts can let us have free ssl certificate. Certbot gives us an easy way to create one. And this tutorial will take you through the process step by step.
Pre-requirement:
There are few things you need before we can begin
- This tutorial is about getting SSL certificate, so I assume you need a SSL certificate for your domain and you actually own that domain. If you don’t have one, well, you don’t really need to have a SSL certificate.
Setup Certbot:
You will need to have WSL installed on your machine. Or if you have a machine with Linux installed, that also will do. Install Certbot is very easy (The following installation instruction is taken from Certbot documentation)!
-
For Arch Linux:
sudo pacman -S certbot -
For Debian
sudo apt-get update sudo apt-get install certbot -
If you are using Debian Stretch:
sudo apt-get install certbot -t stretch-backports -
For Ubuntu 18.04 or lower:
sudo apt-get update sudo apt-get install software-properties-common sudo add-apt-repository universe sudo add-apt-repository ppa:certbot/certbot sudo apt-get update sudo apt-get install certbot -
For Ubuntu 20.04:
sudo apt-get update sudo apt-get install certbot -
For Fedora:
sudo dnf install certbot python2-certbot-apache -
For FreeBSD:
cd /usr/ports/security/py-certbot && make install clean pkg install py27-certbot -
For Gentoo Linux:
emerge -av app-crypt/certbot -
For NetBSD:
cd /usr/pkgsrc/security/py-certbot && make install clean pkg_add py27-certbot -
For OpenBSD:
  cd /usr/ports/security/letsencrypt/client && make install clean
  pkg_add letsencrypt
If you encounter any problem or your OS is not listed above, you can go here for official documentation for troubleshooting.
Generating SSL Certificate:
Now you have Certbot installed, we can start generating SSL certificate. In fact generating SSL certificate is very easy, it only require one command to to so, but you need to do bit of prep work.
-
During generation process, Certbot needs to verify the domain name you supplied is actually yours. The simplest way to do so is through DNS record, so you will need to know how to do that, and the procedures are different from different register. Here I have list of links to few well-known register’s documentation on how to change it. If you don’t find your domain register, google it, you can expect to get to know how to do it within 15 minutes.
-
GoDaddy: Changing TXT record
-
NameCheap: How to Change DNS
-
Register365: Change DNS Setting
-
.TechDomain: Manage DNS resources
-
- Notice: From here on, I am using my own domain name rustedwizard.com as an example. When you do, just subsitute it to your own domain name. Once you found out how to update your DNS record you are ready to go. Let’s generate our cert file. Here, to run following command you need supply your own domain name and here in this tutorial I am using my rustedwizard.com.
-
If you want to generate Wild Card SSL certificate (which means you can use it to encrypt all sub domians), your need supply your domain name as
*.rustedwizard.com,rustedwizard.com -
so run following command in bash window:
sudo certbot certonly -d *.rustedwizard.com,rustedwizard.com --manual --preferred-challenges dns
-
-
During the running of the above command you will encounter following question ask if you are ok that your ip is logged:
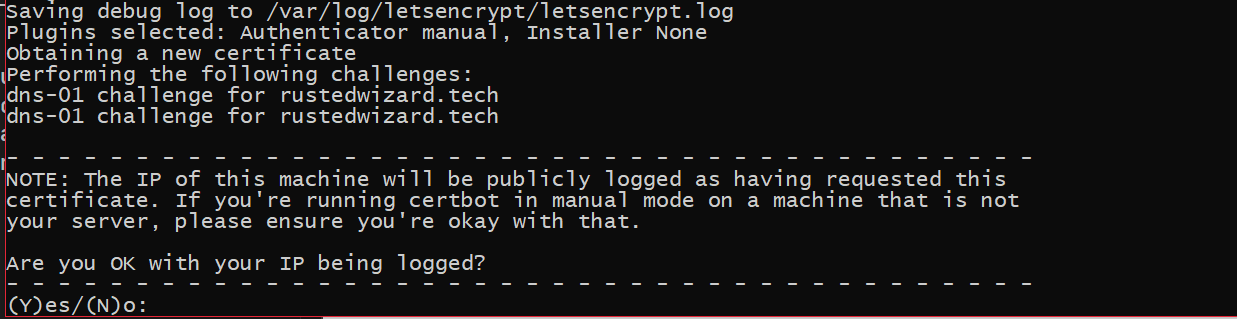
type Y to accept that since you are requesting and certificate from certificate authority, it is reasonable for them to have it logged.
-
After you accept that, you will encounter following prompt to ask you update dns record, this is where Certbot get to know if you own this domain name.

this is where you need goto your register’s website, sign into your account and following the procedure your found out earlier to update the DNS record.
-
After you updated DNS record, wait a couple minutes since DNS record do take some time to propagate through internet. Then press Enter.
-
If everything goes correctly, you should see something like following when execution if finished.

-
As you can see, it tells us that the cert file now stored at /etc/letsencrypt/live/rustedwizard.com-003. Note that the folder name will be different. At this step if .pem file is good for your need (given the fact the web host service can take it.), then you are done. But if you need .pfx file we need to do one more step.
-
We need use openssl to generate .pfx file. So we need to run following command. (remober to update following command since the folder name will be different)
 sudo -i
 cd /etc/letsencrypy/liverustedwizard.com-003
 openssl pkcs12 -export -out bundle.pfx -inkey privkey.pem -in cert.pem -certfile chain.pem
During execution of openssl you will be prompted to enter password for .pfx file. When done, you can freely copy the .pfx file to the location you want and go head use it for your website.
The End
Thank you for reading this tutorial if you found any issue, please file a Github issue at my Github repo