Use Dependency injection and Entity Framework Core (Code First Approach) in Azure Functions (In-Process) v3
You can check out the example project on GitHub here
Setup
In this tutorial Visual Studio 2019 is used. However there should not be too much of difference if you use different version of Visual Studio.
For Entity Framework core, Code-First-Approach is used in this tutorial, for database, this tutorial uses Microsoft SQL Server.
As time of writing this tutorial .Net Core 3.1 LTS is used for In-Process Model. Warning: DO NOT USE .Net 5 since you will encounter this issue.
However, there is a good news for .Net 5, you can use Azure Function (Isolated) on .Net 5 where the function is running in separate process, as a result, by default, you get full control over Dependency Injection and you can configure Entity Framework just as you configure it in ASP.Net project. You can check out documentation here
Project Creation
Now let’s setup the project.
As following GIF shows, in Visual Studio Create a new Azure Function Project. In this tutorial I name it AzFunc, you may name it any name you want.
Install Nuget packages
There are few Nuget packages we need to install before we get to the code.
DUE TO THE FACT WE USE .Net 3.1, WE NEED TO PAY A LITTLE BIT ATTENTION ON VERSIONS WHEN WE INSTALL NUGET PACKAGES.
Here is a list of Nuget packages we need to install:
You may notice that most of above metioned packages are not the latest. The reason is we are using .Net core 3.1, you have to keep the version match (basically 3.1.x matches to .Net core 3.1, 5.0.x matches to .Net core 5)
Now as following GIF shows, do following to install packages.
-
right click Dependencies in Solution Explorer.
-
Click Manage Nuget Packages.
-
Search above mentioned packages in Browse tab.
-
Select the package and select the version on right hand side.
-
Click install to install package (accept all license agreement during the process).

Coding
At this point all setup work is complete. We can now get to do some coding.
Enable Dependency injection
The very first task would be enable Dependency injection in this project. This job relies on the Microsoft.Azure.Functions.Extensions v1.1.0 package we installed earlier. It provides a very simple way to do so.
Here is what you need to do, as GIF shows:
- Create a new C# file name it Startup.cs.
- Put following code in the file.
using Microsoft.Azure.Functions.Extensions.DependencyInjection;
using System;

[assembly: FunctionsStartup(typeof(AzFunc.StartUp))]

namespace AzFunc
{
    public class StartUp : FunctionsStartup
    {
        public override void Configure(IFunctionsHostBuilder builder)
        {

        }
    }
}
What happened in above code is that the attribute [assembly: FunctionsStartup(typeof(AzFunc.StartUp))] tells Azure function when starting up the StartUp class defined in namespace AzFunc is where it needs to start. And as you may notice the StartUp class inherited from abstract class FunctionsStartup and override the method void Configure(IFunctionsHostBuilder builder). As a result, at startup this Configure method gets called, and this is where give us chance to configure dependency injection as we need.
Entity Framework
With Dependency Injection enabled, we can start coding the Entity Framework part. In this tutorial, I will stay simple, a simple Todo program is what I am going to create; which contains only one Model called Todo.
Create Todo Model
Before we work with Entity Framework, let’s create model first. To do it, As following GIF shows, simply:
-
Create a new folder named Model (this is only for purpose of keep code organized).
-
Create new Todo.cs file
Modify Todo.cs file, make sure it contains following code:
using System;

namespace AzFunc.Models
{
    //Use Fluent API in DbContext class. So this class can be kept clean
    public class Todos
    {
        public Guid Id { get; set; }

        public string Name { get; set; }

        public string Description { get; set; }

        public string Comment { get; set; }

        public DateTime StartTime { get; set; }

        public DateTime EndTime { get; set; }
    }
}
As you can see, it’s a very simple class, but it is enough for demonstration purpose. Now, let’s get to the DbContext part
Create TodoDbContext
To create a TodoDbContext, simple do following:
-
Create new folder called DbContext (To keep code organized).
-
Create new file called TodoDbContext.cs.
As following GIF shows:
Modify TodoDbContext, put following code in this file:
using AzFunc.Models;
using Microsoft.EntityFrameworkCore;

namespace AzFunc.DbContext
{
    public class TodoDbContext : DbContext
    {
        public DbSet<Todos> todos { get; set; }

        public TodoDbContext(DbContextOptions op) : base(op)
        { }

        protected override void OnModelCreating(ModelBuilder builder)
        {
            builder.Entity<Todos>().HasKey(x => x.Id);
            builder.Entity<Todos>().HasIndex(x => x.Id);
            builder.Entity<Todos>().Property(x => x.Name).HasMaxLength(60).IsRequired();
            builder.Entity<Todos>().Property(x => x.Description).HasMaxLength(500).IsRequired();
            builder.Entity<Todos>().Property(x => x.Comment).HasMaxLength(300);
        }
    }
}
In this tutorial, I am using Fluent API instead of Data Annotation, so I can keep the Todo class clean. As you can see the GUID type ID of Todo class is the primary key and index. Property Name and Description can not be null and has maximum length of 60 and 500 characters. As for comment there’s a maximum length of 300 characters limit. For StartTime and EndTime, since DateTime type in C# is a value type, and it’s not nullable (unless you make it nullable by using DateTime?), so by default, it will be required as database column.
Enable Code First in project
If you have any experience in ASP.Net and Entity Framework, at this point you would start using Add-Migration and Update-Database. However, if you try this now in Azure Functions Project, you would get error. Because, EntityFramework does not know how to create TodoDbContext when we invoke Add-Migration tool. Luckily, it is very easy and only involve a little bit more coding to tell it how to create one and we are ready to go.
To do so we need to implement interface IDesignTimeDbContextFactory, so let’s do following:
-
Create new folder called DbContextFactory
-
Create new file called TodoDbContextFactory.cs
As following GIF shows:
Now, modify the file, make sure following code is in the file:
using AzFunc.DbContexts;
using Microsoft.EntityFrameworkCore;
using Microsoft.EntityFrameworkCore.Design;
using System;

namespace AzFunc.DbContextFactory
{
    public class TodoDbContextFactory : IDesignTimeDbContextFactory<TodoDbContext>
    {
        public TodoDbContext CreateDbContext(string[] args)
        {
            var opBuilder = new DbContextOptionsBuilder<TodoDbContext>();
            opBuilder.UseSqlServer(Environment.GetEnvironmentVariable("SqlConnection"));
            return new TodoDbContext(opBuilder.Options);
        }
    }
}
Create Migration and Update Database
Above code will enable you to use Code-First-Approach in Azure Functions Project. Now, you may go ahead use Add-Migration and Update-Database. Notice that in above code, we get connection string from environment variable, and since we are use add-migration tool, you need to make sure the environment variable is properly set.
You can easily do that in Nuget Package Manager -> Package Manager Console, since it’s powershell windows you can set environment variable for current session with command:
$env:SqlConnection="<your connection string here>"
Assuming you have Sql Server installed on you local machine, the specific command would look like fowlloing:
$env:SqlConnection="Server=localhost; Database=Todo; Integrated Security=true"
Add-Migration init
Update-Database
Following GIF shows the entire process:
You can verify the process is successful by checking following places:
*First verify the migration has been created. At Solution Explorer you should see a folder named Migrations and have some files like following images.

*Check for database, you may check if database has been created by using some tools like Azure Data Studio or Database Explorer in Visual Studio. You should see a new Database name Todo got created and looks like following:
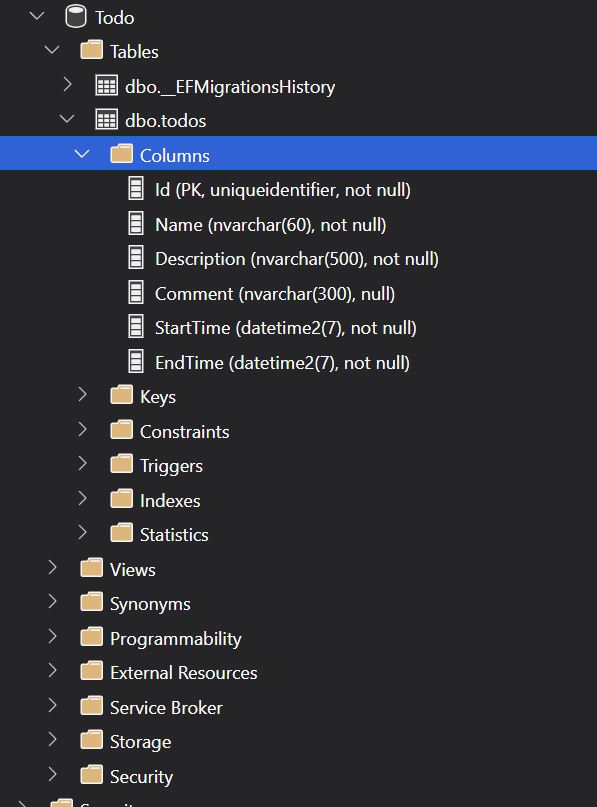
At this point, you have Entity Framework all setup and you database and Models are ready to go.
Hook up DbContext to Dependency Injection
Now, we have our database, model and DbContext ready, we now need to get it work with Dependency Injection we previously setup. We can easily get it done by do following:
Setup connection string in local.settings.json
First we need get connection string setup for local machine. Azure Functions Project provides us a place to do so in local.settings.json. You can do so in following steps:
-
Open local.settings.json
-
Within the scope of
"Values"put a new line like following:
"SqlConnection":"Server=localhost; Database=Todo; Integrated Security=true"
As a result the local.settings.json should looks like following:
{
    "IsEncrypted": false,
    "Values": {
        "AzureWebJobsStorage": "UseDevelopmentStorage=true",
        "FUNCTIONS_WORKER_RUNTIME": "dotnet",
        "SqlConnection": "Server=localhost; Database=Todo; Integrated Security=true"
    }
}
Remember to replace sql connection string with you own!
Warning: Please remember local.settings.json is for local development purpose only, so you should NEVER check this file into you repository. Also you should NEVER hard code database connection string anywhere in the project. Luckily, by default, Visual Studio created a .gitignore file which include entry to ignore local.settings.json file. When this function works on Azure cloud, you will need to configure database connection string in Application Settings, so you do not need modify your code
Hook up DbContext with Dependency injection
In StartUp.cs we created following modify the code to make it looking like following:
using AzFunc.DbContexts;
using Microsoft.Azure.Functions.Extensions.DependencyInjection;
using Microsoft.EntityFrameworkCore;
using Microsoft.Extensions.DependencyInjection;
using System;

[assembly: FunctionsStartup(typeof(AzFunc.StartUp))]

namespace AzFunc
{
    public class StartUp : FunctionsStartup
    {
        public override void Configure(IFunctionsHostBuilder builder)
        {
            var connectionString = Environment.GetEnvironmentVariable("SqlConnection");
            _ = builder.Services.AddDbContext<TodoDbContext>(op =>
                  SqlServerDbContextOptionsExtensions.UseSqlServer(op, connectionString));
        }
    }
}
Now, all Dependency Injection and Entity Framework part is done. We can get Azure Function part.
Create API for Azure Function
Finally, we get to create API for Azure Function.
To do that, simply follow following steps:
-
Rename Function1.cs to AzFunc.cs (or some other meaningful name).
-
Modify the code, so the file looks like following:
using AzFunc.DbContexts;
using AzFunc.Models;
using Microsoft.AspNetCore.Http;
using Microsoft.AspNetCore.Mvc;
using Microsoft.Azure.WebJobs;
using Microsoft.Azure.WebJobs.Extensions.Http;
using Microsoft.EntityFrameworkCore;
using Microsoft.Extensions.Logging;
using Newtonsoft.Json;
using System;
using System.Collections.Generic;
using System.IO;
using System.Linq;
using System.Threading.Tasks;

namespace AzFunc
{
    public class AzFunc
    {
        private readonly TodoDbContext _context;

        public AzFunc(TodoDbContext context)
        {
            _context = context;
        }

        [FunctionName("Get")]
        public async Task<IActionResult> Run(
            [HttpTrigger(AuthorizationLevel.Function, "get", Route = "get")] HttpRequest req,
            ILogger log)
        {
            log.LogInformation($"{DateTime.Now.ToUniversalTime()}: Get all Todo item request recieved");
            var todos = await _context.todos.ToListAsync();
            return new OkObjectResult(todos);
        }

        [FunctionName("Add")]
        public async Task<IActionResult> AddOne(
            [HttpTrigger(AuthorizationLevel.Function, "post", Route = "addone")] HttpRequest req,
            ILogger log)
        {
            log.LogInformation($"{DateTime.Now.ToUniversalTime()}: Add one new item request recieved");
            var reqBody = await new StreamReader(req.Body).ReadToEndAsync();
            var t = JsonConvert.DeserializeObject<Todos>(reqBody);
            _ = await _context.AddAsync(t);
            var c = await _context.SaveChangesAsync();
            if (c == 0)
            {
                return new BadRequestObjectResult($"Following object have not been insert into database \n {t}");
            }
            return new OkObjectResult(t);
        }

        [FunctionName("AddMany")]
        public async Task<IActionResult> AddMany(
            [HttpTrigger(AuthorizationLevel.Function, "post", Route = "addmany")] HttpRequest req,
            ILogger log)
        {
            log.LogInformation($"{DateTime.Now.ToUniversalTime()}: Add many items request recieved");
            var reqBody = await new StreamReader(req.Body).ReadToEndAsync();
            var list = JsonConvert.DeserializeObject<List<Todos>>(reqBody);
            foreach (var t in list)
            {
                _ = await _context.AddAsync(t);
            }
            var c = await _context.SaveChangesAsync();
            if (c != list.Count)
            {
                return new BadRequestObjectResult($"Not all object have been saved to database \n {list}");
            }
            return new OkObjectResult(list);
        }
    }
}
As you can see, the constructor public AzFunc(TodoDbContext context) takes TodoDbContext as parameter which is how Dependency Injection supposed to work, and we get to use DbContext just like we use DbContext in any other project. Above code only shows 3 api functions as example, you can go ahead add more as you need to.
Test with Postman
Now we can see this Azure Function in action on local machine.
Start Postman (if you do not have it, download and install it from here)
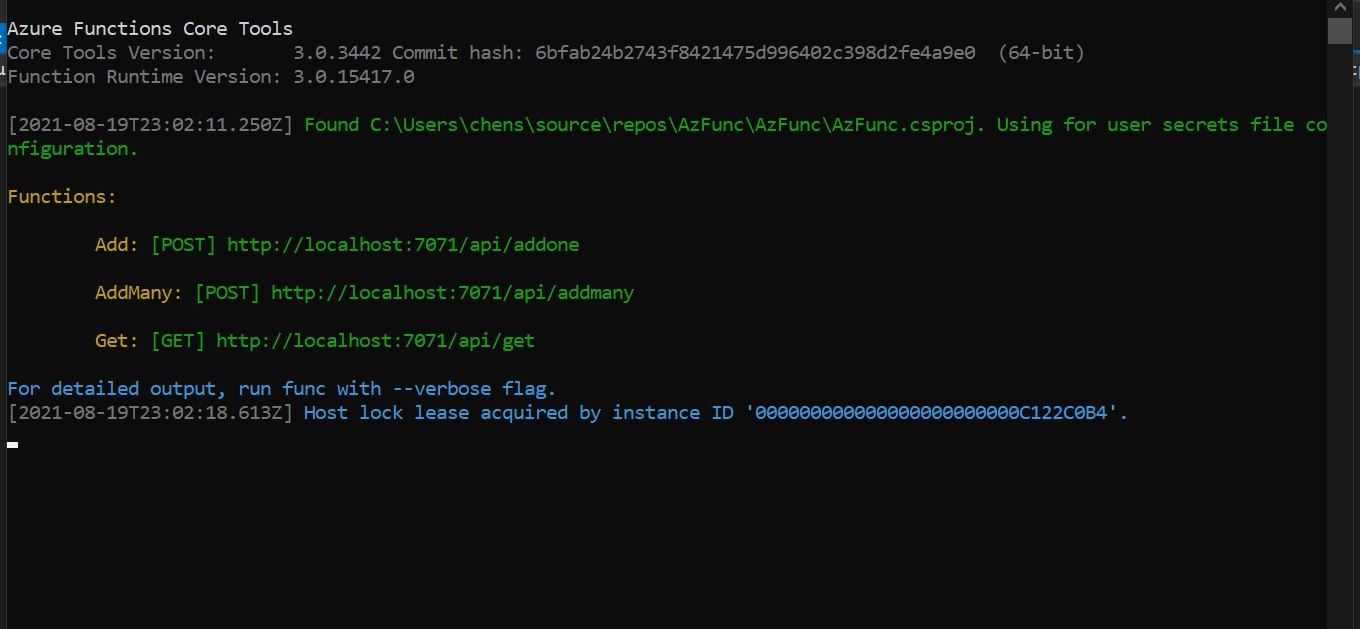
- Press F5 to start Debug run of Azure Functions project, and you shall see console window looks like following:
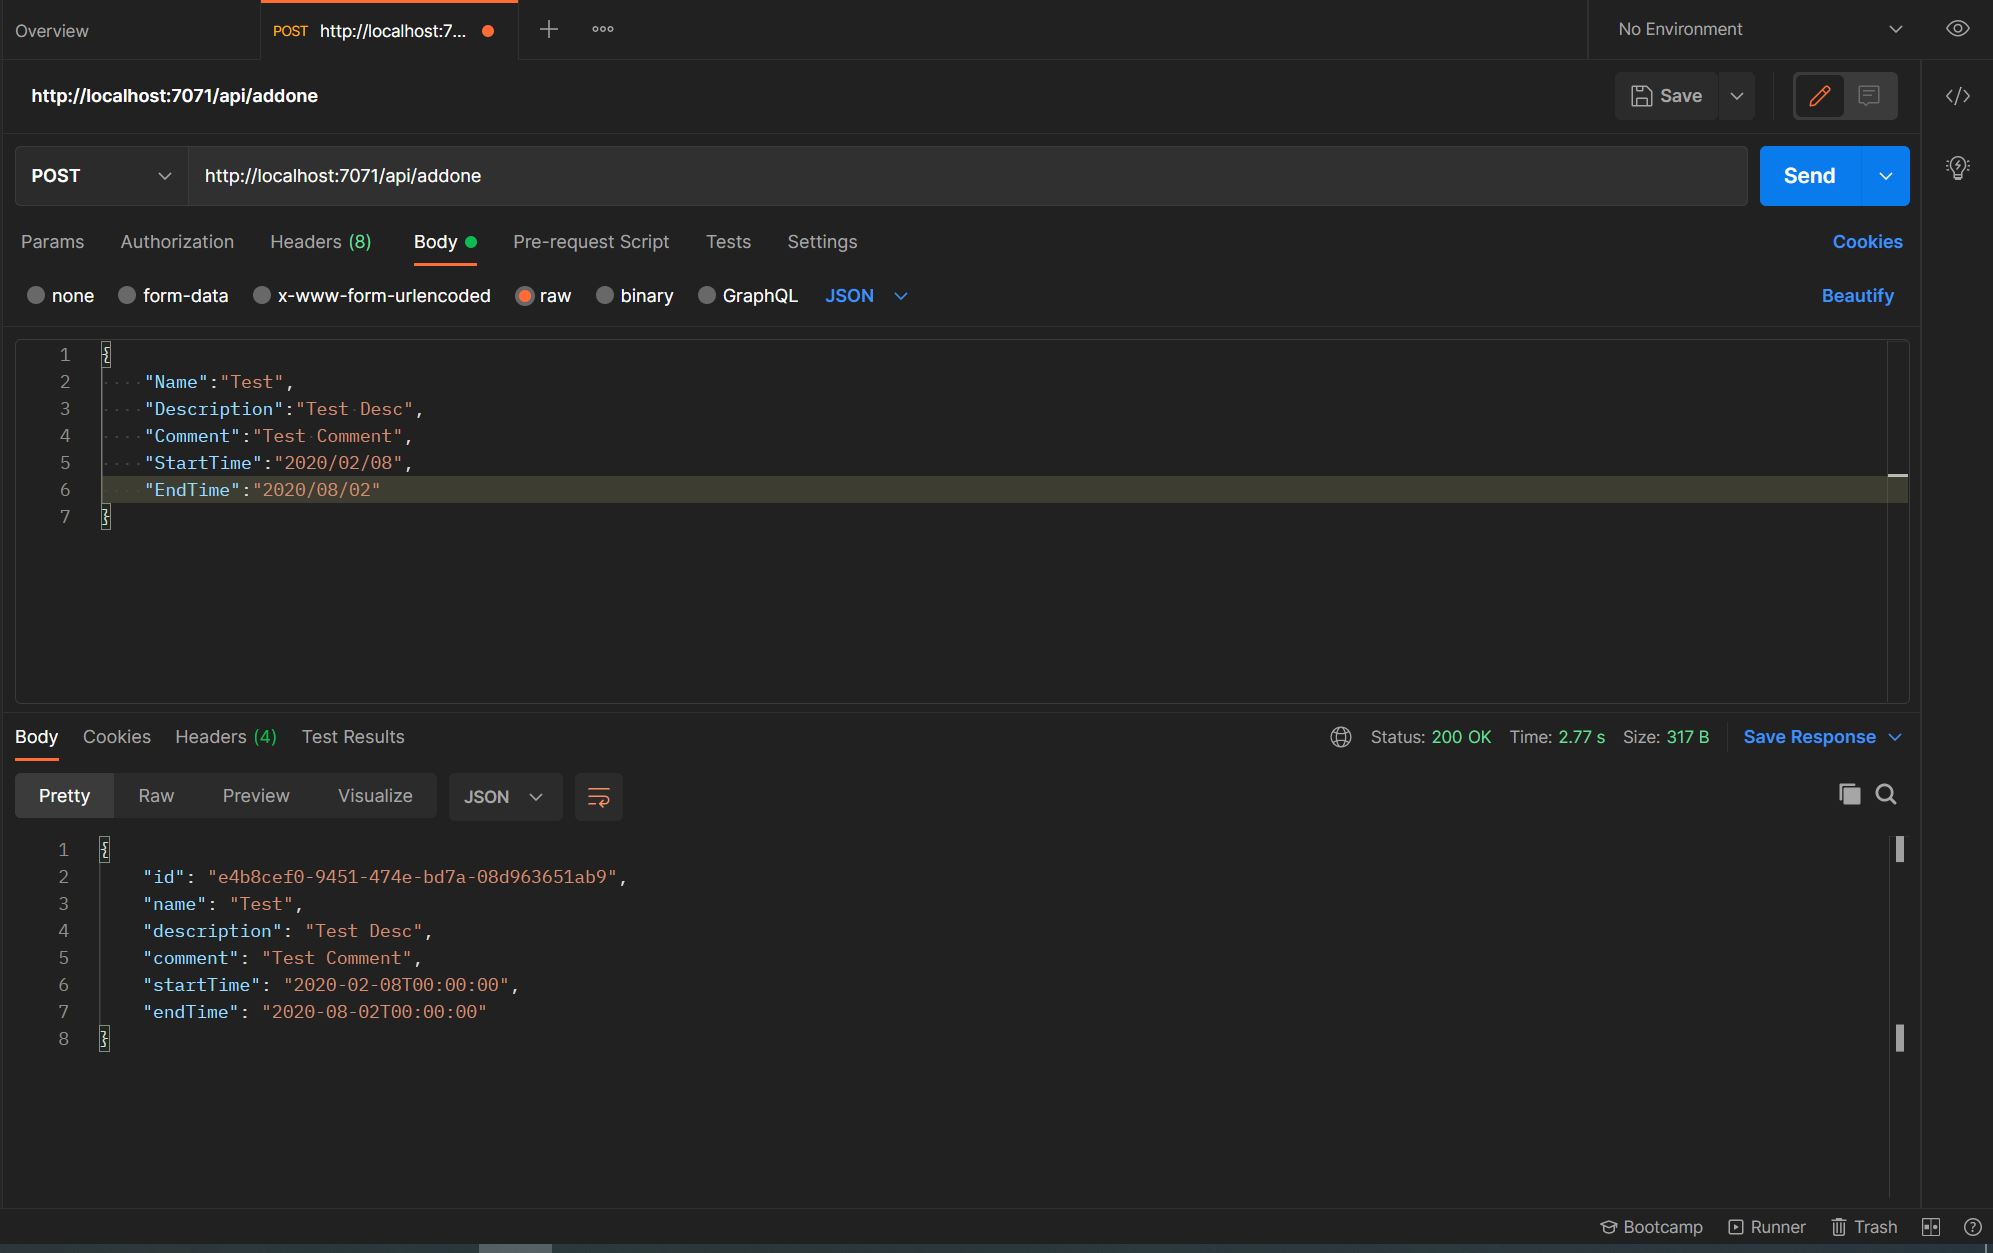
- Here we test the Add function, so create a new POST request with following json body:
{
    "Name":"Test",
    "Description":"Test Desc",
    "Comment":"Test Comment",
    "StartTime":"2020/02/08",
    "EndTime":"2020/08/02"
}
Hit the send button, And you should see in output pane that the same message get send back (As we programmed) like following:
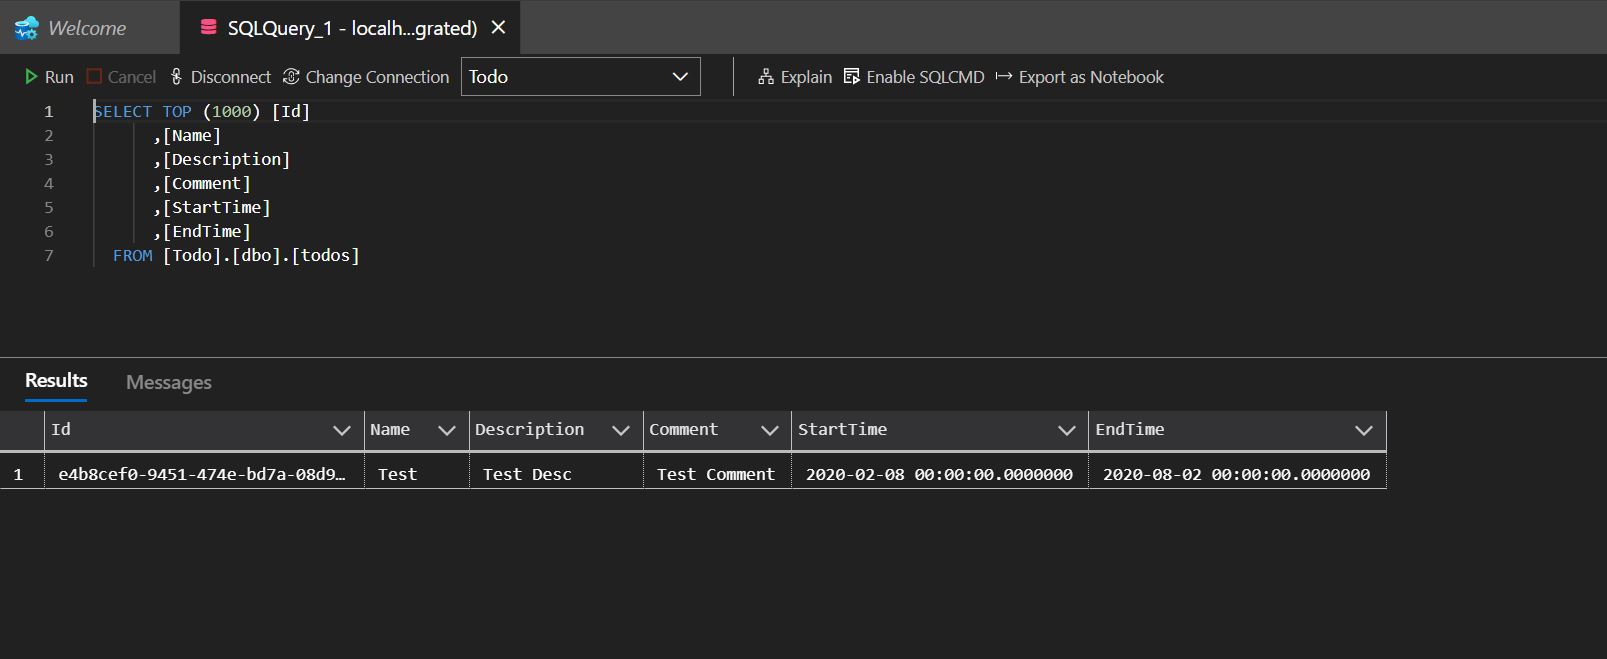
Now, we can verify that the data actually get added, by verify it in database as following Azure Data Studio screenshot shows:
End Note
Now, you have gone through the entire process of using Entity Framework and Dependency Injection in Azure Functions. Hope you found this tutorial useful. Also, you can check out the example project on GitHub here